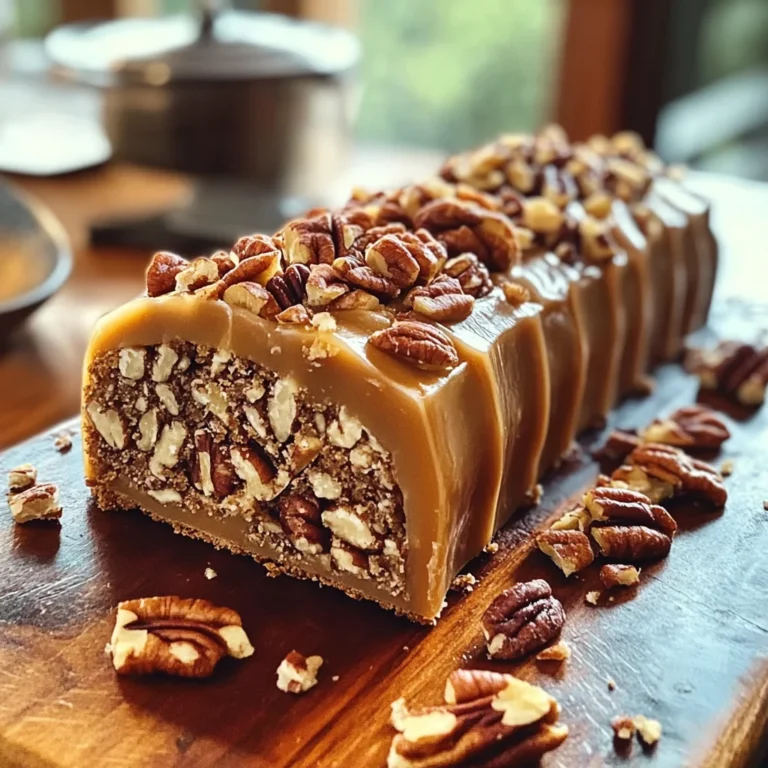
Easy Turtle Bars
If you’re looking for a sweet treat that’s both easy to make and absolutely delicious, then you’ve come to the right place! These Easy Turtle Bars are a favorite in my kitchen, combining rich chocolate, crunchy pecans, and a gooey caramel layer that will have everyone asking for seconds. They’re perfect for busy weeknights when you want something special without spending hours in the kitchen, or for family gatherings where you want to impress your loved ones with minimal effort.
What makes these bars truly special is their delightful texture and flavor profile. Each bite is a wonderful blend of creamy chocolate and crunchy nuts, all tied together with a luscious caramel sauce. Trust me, once you try making these Easy Turtle Bars, they’ll become a go-to recipe that you’ll cherish and share with friends!
Why You’ll Love This Recipe
- Quick and Simple: This recipe is straightforward, making it easy for even novice bakers to whip up a batch.
- Family Favorite: With flavors that appeal to everyone, these bars are sure to be a hit at any gathering!
- Make-Ahead Delight: You can prepare these in advance and store them for later—perfect for busy days when you still want a treat.
- Customizable Toppings: Feel free to get creative with toppings; there are plenty of ways to make these bars your own!
Ingredients You’ll Need
The best part about making Easy Turtle Bars is how simple and wholesome the ingredients are. You likely have most of them in your pantry already! Here’s what you’ll need:
- 1 and 1/2 cups all-purpose flour
- 1/2 cup brown sugar, packed
- 1/2 cup unsalted butter, cold and cubed
- 1 cup pecan halves
- 2/3 cup butter
- 1/2 cup brown sugar, packed
- 1 cup milk chocolate chips
- Extra chopped pecans
- Sea salt flakes
- Drizzled caramel sauce
Variations
This recipe is wonderfully flexible! Here are some fun ideas to change things up:
- Add Different Nuts: Try using walnuts or almonds instead of pecans for a twist on flavor.
- Go Nut-Free: Omit the nuts entirely or replace them with seeds like sunflower seeds for crunch without allergens.
- Switch Up the Chocolate: Use dark chocolate chips for a richer taste or even white chocolate if that’s more your style!
- Mix in Some Fruit: Toss in dried fruit like cranberries or cherries for an added burst of flavor.
How to Make Easy Turtle Bars
Step 1: Preheat Your Oven
Start by preheating your oven to 350°F (175°C). This ensures that your bars bake evenly. Line a 9×13 inch baking pan with parchment paper so you can easily lift out the bars after baking.
Step 2: Create the Crust
In a medium mixing bowl, combine the flour and brown sugar. Cut in the cold butter using a pastry blender or two knives until it looks like coarse crumbs. Working quickly helps keep the butter cold, which gives your crust that perfect flaky texture.
Step 3: Press Down the Crust
Once your mixture resembles sandy crumbs, press it into the bottom of your prepared pan. Make sure it’s even; this will be the sturdy base for all those delicious layers to come!
Step 4: Sprinkle on the Pecans
Now it’s time to sprinkle those lovely pecan halves over your crust. This step adds such great flavor and crunch that pairs perfectly with the upcoming caramel layer.
Step 5: Prepare the Caramel Layer
In a small saucepan over medium heat, combine more butter and brown sugar. Stir constantly until it bubbles—this is where magic happens! Keep cooking and stirring for exactly one minute after it starts boiling; this helps achieve just the right caramel consistency!
Step 6: Pour Over Crust & Pecans
Carefully pour that hot caramel mixture over your pecans and crust. If needed, use a spatula to spread it out evenly—every bite deserves some of that gooey goodness!
Step 7: Bake Until Golden
Pop the pan into your preheated oven and bake for about 18-20 minutes until it’s bubbly and golden brown on top. The aroma wafting through your kitchen will be heavenly!
Step 8: Add Chocolate Chips
As soon as they come out of the oven, sprinkle chocolate chips over the hot bars. Let them sit for just a few minutes so they can melt beautifully.
Step 9: Spread That Chocolate
Once softened, take an offset spatula or simply use the back of a spoon to spread out that melted chocolate into an even layer. This step makes every bite rich and chocolaty.
And there you have it—your Easy Turtle Bars are ready! Let them cool completely before slicing into squares. Enjoy every delicious bite!
Pro Tips for Making Easy Turtle Bars
Making Easy Turtle Bars can be a breeze with a few handy tips to ensure perfection in every bite!
- Use cold butter: Starting with cold, cubed butter helps create a flaky and crumbly crust. This prevents the butter from melting prematurely and ensures a delightful texture.
- Don’t skip the parchment paper: Lining your baking pan with parchment paper not only makes removal easier but also helps prevent sticking, ensuring your bars stay intact when you cut them.
- Watch the caramel closely: Caramel can go from perfect to burnt quickly! Stir continuously and keep an eye on it as it bubbles for that ideal gooey consistency.
- Let the chocolate chips melt: Allowing the chocolate chips to sit on top of the hot caramel for a few minutes before spreading them creates a smoother, more even layer without breaking the chips apart.
- Allow cooling time: Patience is key! Letting your bars cool completely before slicing allows them to set properly, making for cleaner cuts and better presentation.
How to Serve Easy Turtle Bars
These Easy Turtle Bars are a delightful treat that can be served in various ways to impress your family and friends. Whether you want to elevate their appearance or create a complete dessert experience, I’ve got you covered!
Garnishes
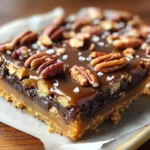
- Chopped pecans: A sprinkle of chopped pecans on top adds an extra crunch and enhances the nutty flavor of the bars.
- Sea salt flakes: A light dusting of sea salt adds contrast to the sweetness, bringing out all those delicious flavors in each bite.
- Drizzled chocolate: For an extra touch of elegance, drizzle some melted chocolate over the bars for visual appeal and added richness.
Side Dishes
- Vanilla ice cream: A scoop of creamy vanilla ice cream pairs beautifully with the warm turtle bars, creating a delightful contrast in temperature and texture.
- Fresh berries: Serving mixed berries like strawberries or raspberries provides a refreshing tartness that balances out the sweetness of the bars.
- Whipped coconut cream: For a dairy-free option, whipped coconut cream adds a luxurious touch while complementing the flavors beautifully.
- Coffee or espresso: A warm cup of coffee or espresso enhances the dessert experience, offering rich flavors that pair well with chocolate and caramel.
With these tips and serving suggestions, your Easy Turtle Bars will not only taste amazing but also look stunning on any table! Enjoy every sweet moment.
Make Ahead and Storage
These Easy Turtle Bars are not only delicious but also perfect for meal prep! You can easily make them ahead of time, ensuring you have a delightful treat ready whenever the craving strikes. Here’s how to store them properly:
Storing Leftovers
- Store the bars in an airtight container at room temperature for up to 5 days.
- For longer freshness, refrigerate them in the same airtight container.
- If you find that they begin to harden a bit, warm them slightly in the microwave for a few seconds before enjoying.
Freezing
- Cut the bars into squares and let them cool completely.
- Place the individual squares on a baking sheet and freeze for about 1 hour until firm.
- Transfer the frozen bars to a freezer-safe bag or container, layering parchment paper between them to prevent sticking. They can be frozen for up to 3 months.
Reheating
- To enjoy your frozen Easy Turtle Bars, simply let them thaw overnight in the refrigerator or at room temperature for a couple of hours.
- If you prefer them warm, microwave each bar for about 10-15 seconds until heated through.
FAQs
If you have questions about making these Easy Turtle Bars, we’ve got you covered!
Can I substitute other nuts in Easy Turtle Bars?
Absolutely! While pecans offer great flavor and texture, feel free to swap them with walnuts or almonds based on your preference or what you have on hand.
How do I make my Easy Turtle Bars even more decadent?
You can drizzle additional caramel sauce or melted chocolate over the top before serving. Adding a sprinkle of sea salt enhances the sweet flavors beautifully!
How long do Easy Turtle Bars last?
When stored properly in an airtight container at room temperature, your Easy Turtle Bars will last up to 5 days. If refrigerated, they can stay fresh even longer!
Can I use gluten-free flour for this recipe?
Yes! You can easily substitute all-purpose flour with a gluten-free blend. Just ensure it’s suitable for baking to achieve the right texture.
Final Thoughts
I hope you find joy in creating these Easy Turtle Bars! They truly highlight the delightful combination of textures and flavors that everyone loves. Whether you’re sharing with friends or enjoying a quiet moment alone with your favorite treat, these bars are sure to bring smiles all around. Happy baking, and don’t forget to savor every bite!
Easy Turtle Bars
- Prep Time: 15 minutes
- Cook Time: 20 minutes
- Total Time: 35 minutes
- Yield: Approximately 16 servings 1x
- Category: Dessert
- Method: Baking
- Cuisine: American
Description
If you’re in search of a delightful dessert that combines rich chocolate, crunchy pecans, and gooey caramel, these Easy Turtle Bars are the answer! This simple recipe is perfect for any occasion, allowing you to whip up a sweet treat with minimal effort. Perfect for busy weeknights or family gatherings, these bars are sure to impress. The layers of flavors and textures come together beautifully, making each bite a mouthwatering experience. Whether enjoyed fresh out of the oven or saved for later, they are guaranteed to be a hit!
Ingredients
- 1 and 1/2 cups all-purpose flour
- 1 cup packed brown sugar (divided)
- 2/3 cup cold unsalted butter (divided)
- 1 cup pecan halves
- 1 cup milk chocolate chips
- Sea salt flakes
- Drizzled caramel sauce
Instructions
- Preheat your oven to 350°F (175°C) and line a 9×13 inch baking pan with parchment paper.
- In a bowl, mix flour and 1/2 cup brown sugar. Cut in 1/3 cup cold butter until crumbly. Press into the prepared pan.
- Sprinkle pecans evenly over the crust.
- In a saucepan, melt remaining butter and brown sugar over medium heat until bubbling. Stir for one minute.
- Pour the caramel mixture over the crust and pecans.
- Bake for 18-20 minutes until golden. Remove from the oven and sprinkle chocolate chips on top.
- Let sit briefly before spreading melted chocolate evenly over the surface.
Nutrition
- Serving Size: 1 bar (40g)
- Calories: 180
- Sugar: 14g
- Sodium: 45mg
- Fat: 8g
- Saturated Fat: 5g
- Unsaturated Fat: 3g
- Trans Fat: 0g
- Carbohydrates: 26g
- Fiber: 1g
- Protein: 2g
- Cholesterol: 15mg