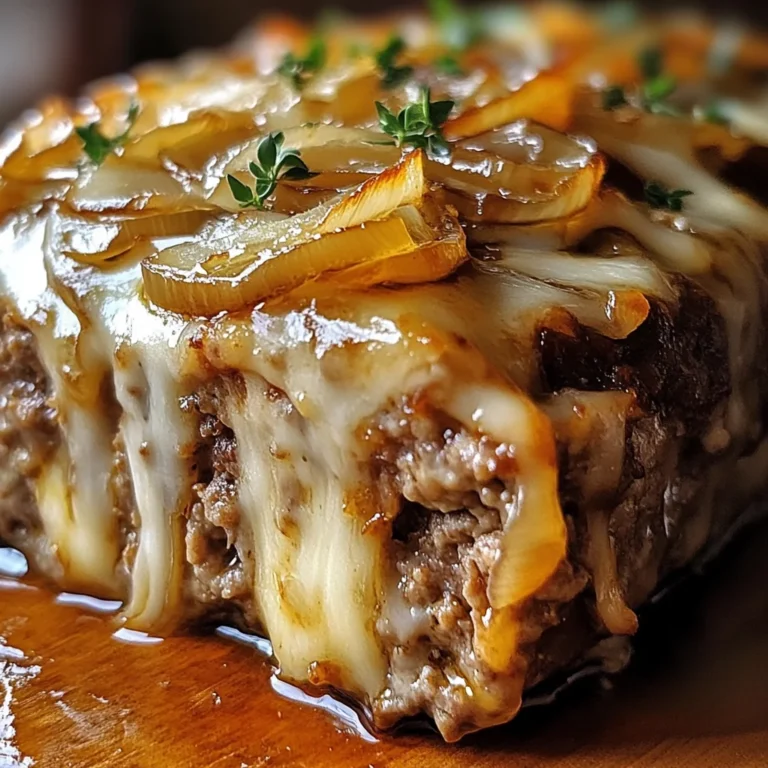
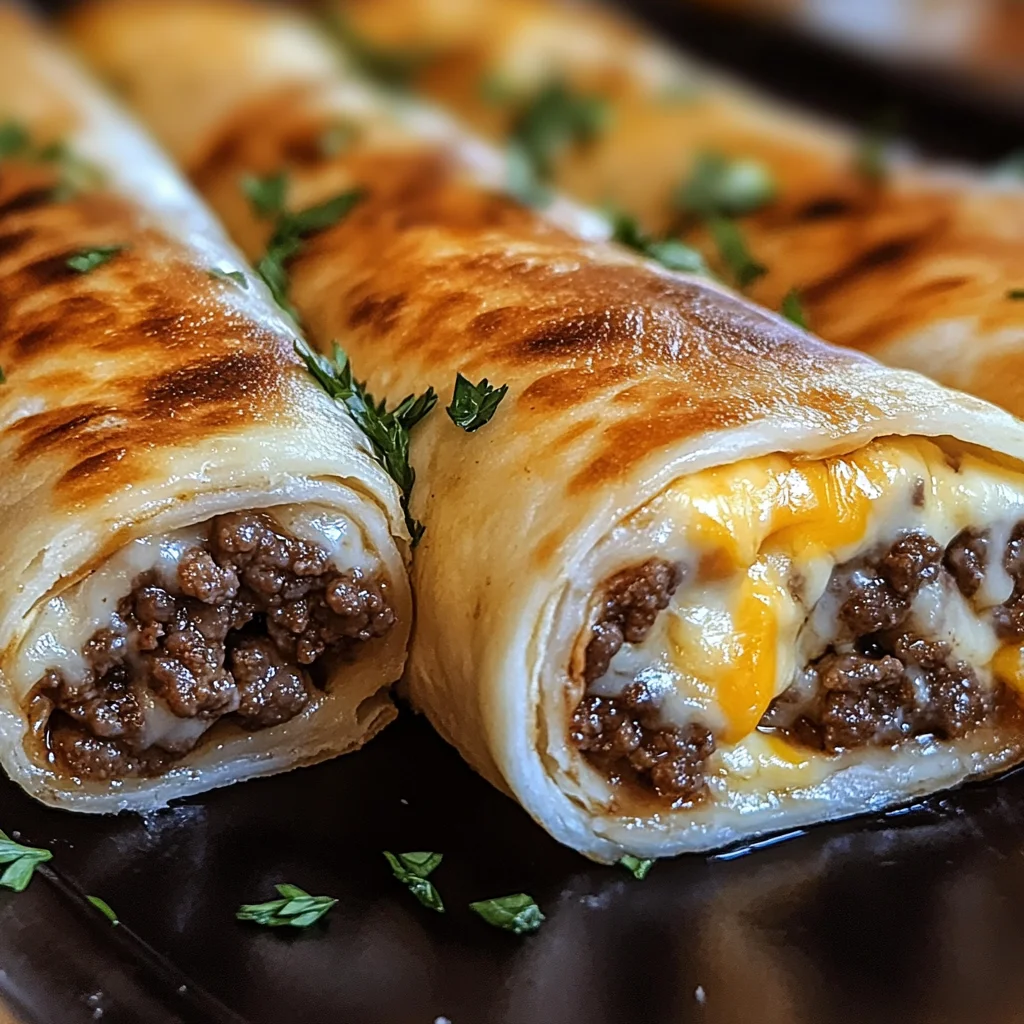
Cheesy Garlic Beef Roll-Ups
If you’re looking for a dish that brings comfort and smiles to the table, then let me introduce you to my cherished Cheesy Garlic Beef Roll-Ups. This recipe has become a staple in our home, perfect for busy weeknights or lively family gatherings. The combination of seasoned ground beef and gooey cheese wrapped snugly in soft tortillas is simply irresistible. Plus, they’re baked until golden and bubbly, making them just as fun to eat as they are to make!
What makes these roll-ups special is how effortlessly they come together. Even on the busiest days, you can whip these up in no time. Whether you’re serving them as an appetizer at a party or enjoying them for dinner with loved ones, these cheesy garlic beef roll-ups are sure to delight everyone.
Why You’ll Love This Recipe
- Quick and Easy: With just 30 minutes from start to finish, you’ll have a delicious meal ready in no time!
- Family-Friendly: Kids and adults alike adore these cheesy bites, making them a hit at any gathering.
- Make-Ahead Convenience: Prepare the filling ahead of time and assemble when you’re ready to bake—perfect for meal prep!
- Customizable: Feel free to add your favorite veggies or spices to make this dish your own.
- Delicious Flavor: The rich taste of seasoned beef combined with cheesy goodness is simply mouthwatering.

Ingredients You’ll Need
Cooking should be fun and stress-free! Here’s a list of simple, wholesome ingredients that come together beautifully in these Cheesy Garlic Beef Roll-Ups.
For the Filling
- 1 lb ground beef
- ½ cup shredded cheddar cheese
- ½ cup shredded mozzarella cheese
- 1 tablespoon olive oil
- 4 large flour tortillas
For the Garlic Butter
- ¼ cup butter, melted
- 3 cloves garlic, minced
For Seasoning
- 1 tablespoon Worcestershire sauce
- 1 teaspoon onion powder
- 1 teaspoon garlic powder
- ½ teaspoon smoked paprika
- Salt and black pepper, to taste
Optional Garnish
- Sliced pickles for garnish
Variations
One of the best things about this recipe is its flexibility! Feel free to get creative with these tasty variations:
- Swap the protein: Use ground turkey or chicken for a lighter option while keeping all the flavor.
- Add some crunch: Toss in some finely chopped bell peppers or spinach for added texture and nutrition.
- Spice it up: Add diced jalapeños or your favorite hot sauce to give these roll-ups a kick!
- Cheese overload: Mix in different cheeses like pepper jack or gouda for an extra cheesy experience.
How to Make Cheesy Garlic Beef Roll-Ups
Step 1: Preheat Your Oven
Start by preheating your oven to 375°F (190°C). This step ensures that your roll-ups bake evenly and come out perfectly crispy.
Step 2: Cook the Ground Beef
In a large skillet over medium-high heat, heat the olive oil. Add the ground beef, breaking it apart with a spatula as it cooks. You want it browned all over—about 7–8 minutes will do. This step builds flavor right into your filling!
Step 3: Season the Beef Mixture
Once your beef is browned, stir in Worcestershire sauce along with onion powder, garlic powder, smoked paprika, salt, and pepper. Mixing well here is key; it allows those savory spices to infuse into every bite. Remove from heat and let it cool slightly.
Step 4: Prepare the Garlic Butter
While your beef cools down a bit, grab a small bowl and combine melted butter with minced garlic. Stir it well before setting aside—this will add so much flavor when brushed on top of your roll-ups!
Step 5: Assemble Your Roll-Ups
Lay each tortilla flat on a clean surface. Evenly distribute the seasoned beef mixture over each one before topping with both cheddar and mozzarella cheeses. Be generous—everyone loves gooey cheese!
Step 6: Roll Them Up Tight
Roll each tortilla tightly while tucking in the sides as you go. This helps keep all that delicious filling secure inside! Place them seam-side down on your lined baking sheet.
Step 7: Brush with Garlic Butter
Now comes the best part! Brush each roll-up generously with your garlic butter mixture. This will create that beautiful golden crust we all love.
Step 8: Bake Until Perfect
Slide those beauties into the preheated oven and bake for about 12–15 minutes until they’re golden brown and bubbly inside. The aroma wafting through your kitchen will be heavenly!
Step 9: Serve Warm
Once they’re out of the oven, let them cool slightly before slicing into pinwheels if desired. Garnish with sliced pickles if you like—and enjoy those delightful cheesy garlic beef roll-ups warm!
Pro Tips for Making Cheesy Garlic Beef Roll-Ups
Creating the perfect cheesy garlic beef roll-ups is a delightful experience, and with a few handy tips, you can elevate your dish to new heights!
-
Use fresh ingredients: Freshly minced garlic and high-quality ground beef will enhance the flavor of your roll-ups significantly. Fresh produce tends to have more aroma and taste, making every bite unforgettable.
-
Don’t overfill the tortillas: While it might be tempting to add extra filling, overstuffing can make rolling difficult and may cause them to burst during baking. Keep it balanced for a neat presentation and easier handling.
-
Experiment with cheeses: Feel free to mix different types of cheese! Adding pepper jack for a little kick or cream cheese for added creaminess can take your roll-ups from good to gourmet.
-
Let them cool before slicing: Allowing the roll-ups to cool slightly after baking makes them easier to slice into pinwheels without losing their shape. This step is crucial for maintaining a beautiful presentation.
-
Store leftovers properly: If you have any leftovers, store them in an airtight container in the refrigerator. Reheat in the oven or air fryer for best results—this keeps them crispy rather than soggy.
How to Serve Cheesy Garlic Beef Roll-Ups
Serving your cheesy garlic beef roll-ups in an appealing way can enhance the dining experience. Here are some ideas to present this delicious dish beautifully!
Garnishes
- Chopped fresh herbs: Sprinkle freshly chopped parsley or cilantro on top right before serving for a pop of color and freshness.
- Sour cream or yogurt dip: A small bowl of sour cream or dairy-free yogurt adds a creamy contrast that complements the savory flavors perfectly.
- Sliced jalapeños: For those who enjoy a bit of heat, adding sliced jalapeños on top or on the side provides an exciting kick!
Side Dishes
- Mexican Street Corn Salad: This tangy and creamy salad brings together sweet corn, lime, and spices, making it a refreshing complement to the hearty roll-ups.
- Guacamole and tortilla chips: Creamy guacamole paired with crispy tortilla chips adds a fun texture contrast while enhancing the Tex-Mex theme.
- Simple green salad: A light salad featuring mixed greens, cherry tomatoes, and a zesty vinaigrette can balance out the richness of the roll-ups.
- Spicy black bean soup: A warm bowl of black bean soup adds depth and spice to your meal while providing a comforting touch that pairs wonderfully with these cheesy delights.
With these serving suggestions, your cheesy garlic beef roll-ups will not only taste fantastic but also impress everyone at your table! Enjoy!
Make Ahead and Storage
These Cheesy Garlic Beef Roll-Ups are perfect for meal prep, allowing you to enjoy delicious flavors throughout the week. You can easily store leftovers or make a batch ahead of time for busy days!
Storing Leftovers
- Allow the roll-ups to cool completely before storing.
- Place them in an airtight container.
- Store in the refrigerator for up to 3 days.
Freezing
- Wrap each roll-up tightly in plastic wrap or aluminum foil.
- Place wrapped roll-ups in a freezer-safe bag or container.
- Freeze for up to 2 months.
Reheating
- Thaw frozen roll-ups overnight in the refrigerator before reheating.
- Preheat your oven to 350°F (175°C).
- Bake for about 15-20 minutes until heated through, or microwave for 1-2 minutes.
FAQs
Here are some common questions about making Cheesy Garlic Beef Roll-Ups:
Can I use different types of cheese in these Cheesy Garlic Beef Roll-Ups?
Absolutely! Feel free to mix and match your favorite cheeses like pepper jack for a spicy kick or gouda for a smoky flavor.
How do I ensure my Cheesy Garlic Beef Roll-Ups are not soggy?
To keep them crispy, avoid overfilling the tortillas and ensure they are rolled tightly. Also, baking them immediately after brushing with garlic butter helps maintain their crunch.
Can I customize the filling for my Cheesy Garlic Beef Roll-Ups?
Yes! You can add vegetables like bell peppers or onions, or even swap out the ground beef for turkey or plant-based alternatives.
Final Thoughts
I hope you find joy in making these Cheesy Garlic Beef Roll-Ups! They’re not just delicious but also versatile enough to suit any occasion. Whether you serve them as a cozy dinner or a crowd-pleasing appetizer, I’m sure they’ll become a family favorite. Enjoy every bite and happy cooking!

Cheesy Garlic Beef Roll-Ups
- Prep Time: 15 minutes
- Cook Time: 15 minutes
- Total Time: 30 minutes
- Yield: Serves 4 (4 roll-ups) 1x
- Category: Main
- Method: Baking
- Cuisine: Tex-Mex
Description
If you’re in search of a dish that combines comfort and flavor, look no further than these Cheesy Garlic Beef Roll-Ups. This delightful recipe features seasoned ground beef and melty cheese wrapped in soft tortillas, baked to golden perfection. Perfect for busy weeknights or fun family gatherings, these roll-ups are not only quick to prepare but also customizable, allowing you to add your favorite veggies or spices. With every bite, enjoy the rich flavors of garlic and cheese that will have everyone coming back for more. Easy to assemble and even easier to eat, these cheesy roll-ups are sure to become a cherished favorite in your home.
Ingredients
- 1 lb ground beef
- ½ cup shredded cheddar cheese
- ½ cup shredded mozzarella cheese
- 4 large flour tortillas
- ¼ cup melted butter
- 3 cloves garlic, minced
- 1 tablespoon olive oil
- 1 tablespoon Worcestershire sauce
- 1 teaspoon onion powder
- 1 teaspoon garlic powder
- ½ teaspoon smoked paprika
- Salt and black pepper, to taste
Instructions
- Preheat your oven to 375°F (190°C).
- In a skillet over medium-high heat, heat olive oil and cook the ground beef until browned (7–8 minutes).
- Stir in Worcestershire sauce, onion powder, garlic powder, smoked paprika, salt, and pepper; remove from heat.
- In a bowl, mix melted butter with minced garlic.
- On each tortilla, spread the beef mixture evenly and top with both cheeses.
- Roll the tortillas tightly and place seam-side down on a baking sheet.
- Brush with garlic butter mixture.
- Bake for 12–15 minutes until golden brown and bubbly.
- Let cool slightly before slicing; serve warm.
Nutrition
- Serving Size: 1 roll-up
- Calories: 370
- Sugar: 1g
- Sodium: 600mg
- Fat: 22g
- Saturated Fat: 10g
- Unsaturated Fat: 10g
- Trans Fat: 0g
- Carbohydrates: 24g
- Fiber: 2g
- Protein: 18g
- Cholesterol: 75mg